

Post by aislin on Jan 24, 2012 13:49:12 GMT
Hi you guys and girls,
this is my way of painting a portrait in PDN.[/size]
1. At first you start by opening a picture, you took or found on google or something. The larger the picture, the better is the result. I will use a picture from an old classmate I found on her webpage

2. Duplicate the original photo layer
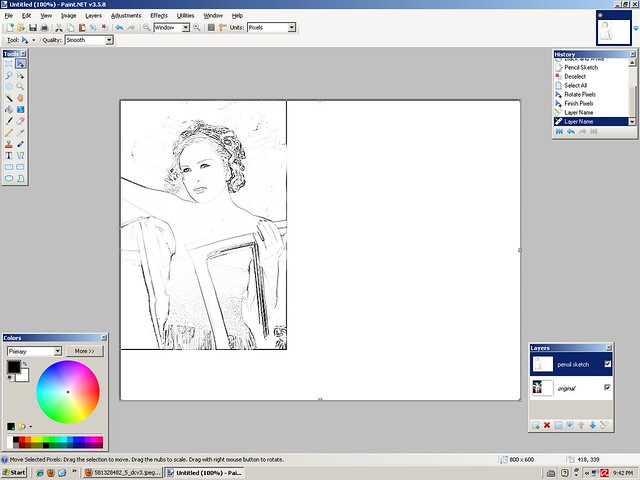
Go to Adjustments - black and white
Go to Effects - Artistic - Pensil Sketch and make sure you will see the most important lines, it doesn't need to be
very detailed because it's just as a guide through the whole progress.
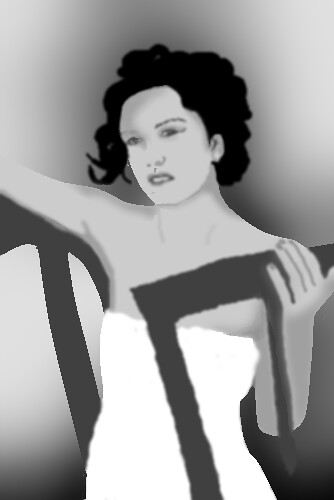
3. Create a new layer above the sketch layer and now comes a fun part:
just paint in diff Grey colors, from black to white where you think it fits. White or light Grey on the parts of the
that needs to be light and darker colors on darker parts. You don't have to be careful yet
Call this layer Basic
4. I also made a simple Background by creating a layer under Basic - fill grey - paint behind the model and a bit more
underneath - Gaussian blur as much as you like.
5. New Layer - on top of Background for the tree. Just find one on google, turn it black and white and play a bit with the
layer properties so it fits perfectly on the background. Then merge layer down and POOF background is done!
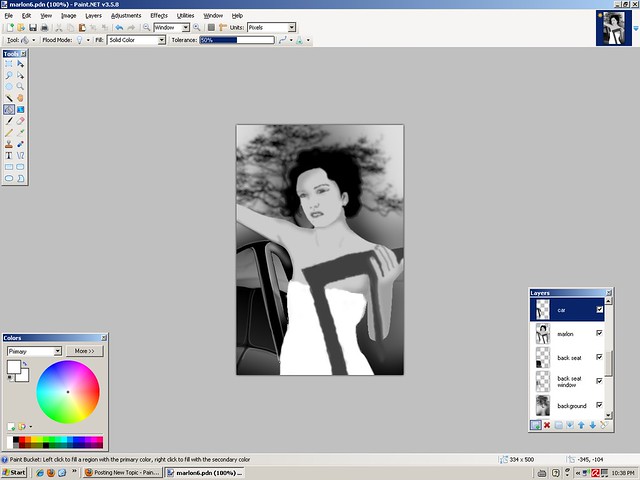
6. As for the car seats and the window behind the seats, you need to create 2 layers UNDERNEATH the Basic, for the simple
reason, she is in front of it in the picture.
Now you can paint using the Paintbrush, Gaussian Blur and Line/Curve, to make it smooth.
7. Add a new layer on top of Basic and call it CAR (this is without the cardoor!)
Why not behind it? Because that part of the car is already painted grey on the Basic. Paint this part of the car in the
same way as for the the seats Make sure, with Line/Curve, that the edges are smooth and straight.
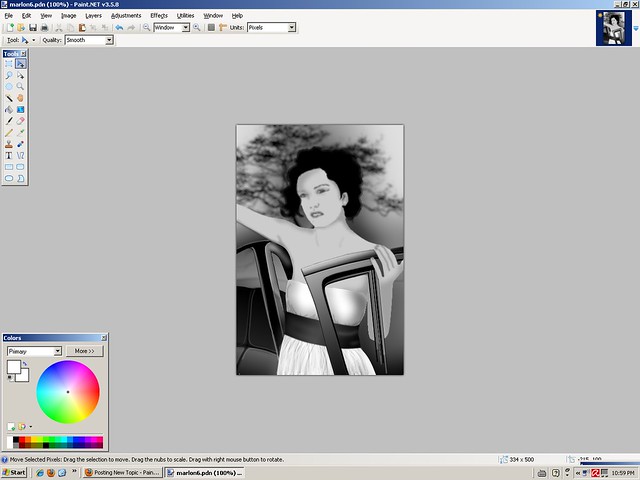
8. Now I made the dress first. I know it is against of what I have said earlier, but the dress was more easy and you can
mix the layers of course. Also, it was my first PDN painting, so I was not as wise as i am now, LOL.
Open a new Layer on top of Car and call it Dress.
Paint the dress white and use the Line/Curve tool to create smooth edges.
Create a new layer and draw some lines on the skirt, using Fragment Blur to make it look more realistic.
Merge Layer down to Dress
Create a new layer and put some shadow on the dress so the boobs are visible (giggles) using Paintbrush and Gaussian
Blur. Merge layer down to dress.
As last, create a new layer, paint the belt black. Create an other layer to make some white highlights, using Gaussian
Blur again - use Transparency if needed.
merge these layers down to the Dress Layer.
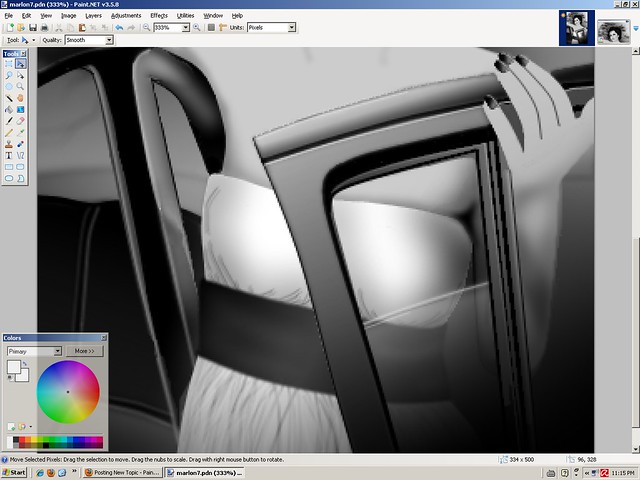
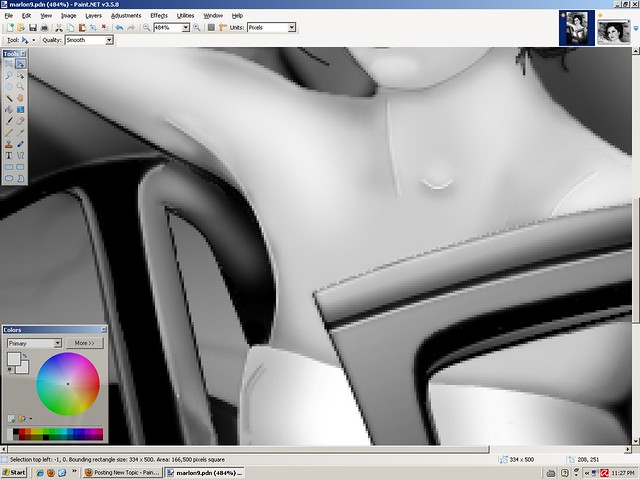
9. Paint the Car door on a layer on top of the Dress layer in the same way as you painted the Car.
 [/url][/center]
10. I did the face, the hair, the nails and the lines between her fingers, a Car door window and a front shadow
Always use more layers for detailed things, such as the eyes, the hair, the mouth. Why? If you, for example, make the
eyes just on one layer and you make a mistake, you have to do it all over again, but if you make a basic layer for
the eye just white, you can build the eye up with layers.
11. now comes the most difficult part, the skin and finishing touch of the face and the hand.
You still use the same methods as before, only you pay a lot of attention to detail. If you have to work with more
detail you use Line/Curve in darker and lighter colors than the skin colors or shadow colors. In that way, you can
really point the details out. Use Transparency when and if needed. You can see the detailed parts in the following images.

12. After all of this, just put some shadows in front, if you like and wherever you like to give it a bit more depth and
realistic look.
I do not know if there are any Shadow tuts, about where to put a shadow if the light comes from a specific direction. If not
I will create a tut of that too, soon. That belongs in fact in every Art, Paint, Draw studies.
If you have any more questions, or you do not understand what I explained, please ask me in this topic.
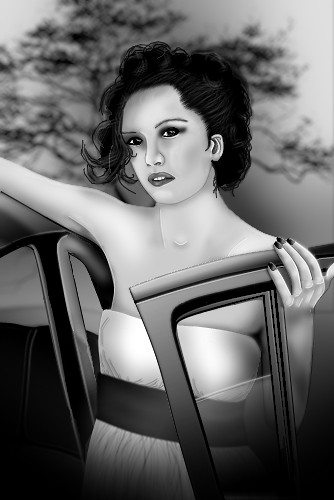
this is my way of painting a portrait in PDN.[/size]
Tools used:
Black and white
Pencil Sketch
Gaussian Blur
Paint Brush
Paint Bucket
Eraser
Selecting Tools
Gradiant
Transparancy
Line/Curve
Fragment Blur
Black and white
Pencil Sketch
Gaussian Blur
Paint Brush
Paint Bucket
Eraser
Selecting Tools
Gradiant
Transparancy
Line/Curve
Fragment Blur
1. At first you start by opening a picture, you took or found on google or something. The larger the picture, the better is the result. I will use a picture from an old classmate I found on her webpage
2. Duplicate the original photo layer
Go to Adjustments - black and white
Go to Effects - Artistic - Pensil Sketch and make sure you will see the most important lines, it doesn't need to be
very detailed because it's just as a guide through the whole progress.
3. Create a new layer above the sketch layer and now comes a fun part:
just paint in diff Grey colors, from black to white where you think it fits. White or light Grey on the parts of the
that needs to be light and darker colors on darker parts. You don't have to be careful yet
Call this layer Basic
You can put the sketch layer on top, where you can make it visible, invisible or change the layer property so you can
see the lines, but also the Basic, underneath. I used Multiply, lol
[/center]see the lines, but also the Basic, underneath. I used Multiply, lol
4. I also made a simple Background by creating a layer under Basic - fill grey - paint behind the model and a bit more
underneath - Gaussian blur as much as you like.
Layers till now:
Pencil Sketch
Basic
Background
Original
It's best to work from bottom to top as in, background first, objects behind the main object second and the objects most in front, such as the hair, the face, the hand as last
Pencil Sketch
Basic
Background
Original
It's best to work from bottom to top as in, background first, objects behind the main object second and the objects most in front, such as the hair, the face, the hand as last
5. New Layer - on top of Background for the tree. Just find one on google, turn it black and white and play a bit with the
layer properties so it fits perfectly on the background. Then merge layer down and POOF background is done!
6. As for the car seats and the window behind the seats, you need to create 2 layers UNDERNEATH the Basic, for the simple
reason, she is in front of it in the picture.
Now you can paint using the Paintbrush, Gaussian Blur and Line/Curve, to make it smooth.
For the window I used Gradiant and Transparancy
7. Add a new layer on top of Basic and call it CAR (this is without the cardoor!)
Why not behind it? Because that part of the car is already painted grey on the Basic. Paint this part of the car in the
same way as for the the seats Make sure, with Line/Curve, that the edges are smooth and straight.
Now you have the following Layers:
Pencil Sketch
Car
Basic (also called: Marlon)
Back Seat
Back Seat Window
Background
Original
Pencil Sketch
Car
Basic (also called: Marlon)
Back Seat
Back Seat Window
Background
Original
8. Now I made the dress first. I know it is against of what I have said earlier, but the dress was more easy and you can
mix the layers of course. Also, it was my first PDN painting, so I was not as wise as i am now, LOL.
Open a new Layer on top of Car and call it Dress.
Paint the dress white and use the Line/Curve tool to create smooth edges.
Create a new layer and draw some lines on the skirt, using Fragment Blur to make it look more realistic.
Merge Layer down to Dress
Create a new layer and put some shadow on the dress so the boobs are visible (giggles) using Paintbrush and Gaussian
Blur. Merge layer down to dress.
As last, create a new layer, paint the belt black. Create an other layer to make some white highlights, using Gaussian
Blur again - use Transparency if needed.
merge these layers down to the Dress Layer.
9. Paint the Car door on a layer on top of the Dress layer in the same way as you painted the Car.
Now you have the following Layers:
Pencil Sketch
Car Door
Dress
Car
Basic (also called: Marlon)
Back Seat
Back Seat Window
Background
Original
Pencil Sketch
Car Door
Dress
Car
Basic (also called: Marlon)
Back Seat
Back Seat Window
Background
Original
You already have an idea of how it works now, I do this always on the same way as written above.
I will show you the next things I did and in the same rank as I did it, but I guess, with a bit of practice you
can do this as good as I. Just use the Line/Curve tool a lot and you can't miss
I will show you the next things I did and in the same rank as I did it, but I guess, with a bit of practice you
can do this as good as I. Just use the Line/Curve tool a lot and you can't miss

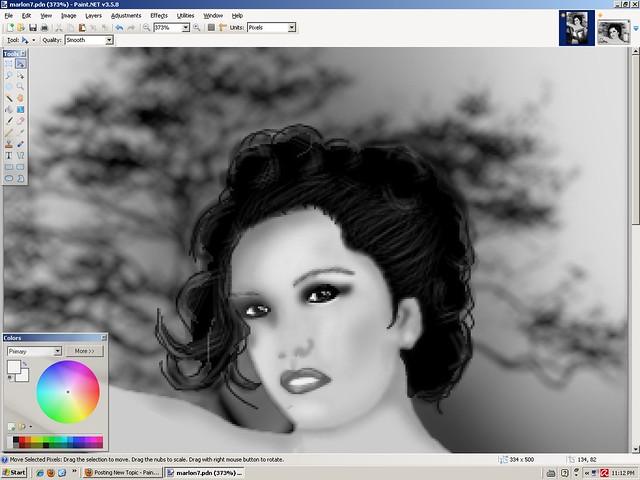
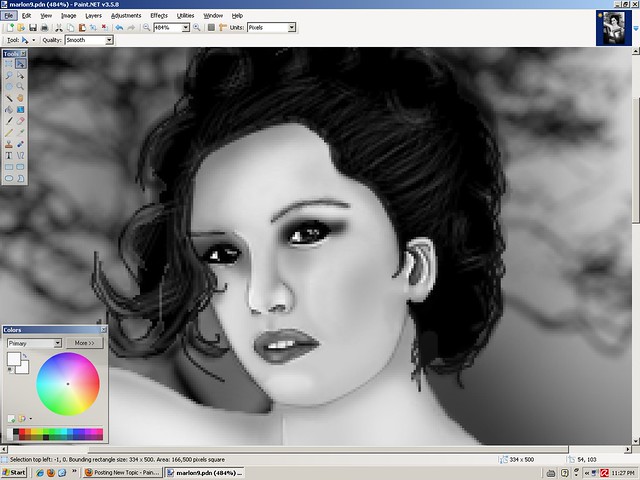
10. I did the face, the hair, the nails and the lines between her fingers, a Car door window and a front shadow
Always use more layers for detailed things, such as the eyes, the hair, the mouth. Why? If you, for example, make the
eyes just on one layer and you make a mistake, you have to do it all over again, but if you make a basic layer for
the eye just white, you can build the eye up with layers.
Example Layers for the eye:
Eyelids
Highlights
Black eye part
Colored eye part
White of the eye
Eyelids
Highlights
Black eye part
Colored eye part
White of the eye
Very soon I will make a special eye tut for very detailed painted eyes*
11. now comes the most difficult part, the skin and finishing touch of the face and the hand.
You still use the same methods as before, only you pay a lot of attention to detail. If you have to work with more
detail you use Line/Curve in darker and lighter colors than the skin colors or shadow colors. In that way, you can
really point the details out. Use Transparency when and if needed. You can see the detailed parts in the following images.
12. After all of this, just put some shadows in front, if you like and wherever you like to give it a bit more depth and
realistic look.
The Layers you will have in the end:
Pencil Sketch
Detail lines
Front shadows
Hair
Face
Arm on front Car Door
Car Door
Dress
Skin and Arm behind Car Door
Car
Basic (also called: Marlon)
Back Seat
Back Seat Window
Background
Original
Pencil Sketch
Detail lines
Front shadows
Hair
Face
Arm on front Car Door
Car Door
Dress
Skin and Arm behind Car Door
Car
Basic (also called: Marlon)
Back Seat
Back Seat Window
Background
Original
I do not know if there are any Shadow tuts, about where to put a shadow if the light comes from a specific direction. If not
I will create a tut of that too, soon. That belongs in fact in every Art, Paint, Draw studies.
If you have any more questions, or you do not understand what I explained, please ask me in this topic.