Post by barbieq25 on Feb 1, 2011 10:57:39 GMT
Plugins:
Object Align -Part of KrisVDM Pack
Mirror - Part of Evanolds pack
Gaussian Blur
Drop Shadow - also part of KrisVDM Pack
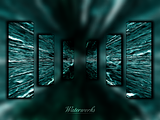
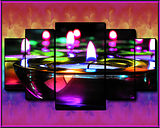
What you are aiming for:

For this one we will make it a wallpaper. I will use 1280 x 768 as the finished size.
Step 1:
Open a new image to 2560 x 1536 so that it is twice the finish size. At 4 times my computer will crash but I usually work at 4 times the finished size if doing 800 x 600.
Step 2:
Make a new layer.
Step 3:
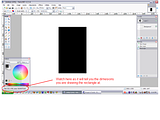
With black as you colour, select filled rectangle. Draw a black rectangle approximately in the centre, approximately 600 pixels wide and 1000 high. It really doesn't need to be exact. You can make more panels or adjust the size, width, height to suit yourself.
See image below for the method:
Step 4:
Use Object Align – Center Both
Step 5:
New layer
Step 6:
Again make a rectangle about 400 x 700 on the left hand side. When moving elements, always use the ellipse or rectangle select. Magic Wand will leave pixels behind – not a good look.
Step 7:
Move the image so that it is about 50 pixels to the left of the centre rectangle.
Step 8:
Object Align – Vertically
Step 9:
Mirror left half over right.
Step 10:
New layer and make a rectangle about 300 x 500. Move the image so that it is about 50 pixels to the left of the previous rectangle.
Step 11:
Object Align – Vertically
Step 12:
Mirror left half over right.
You can make the rectangles any size you like, have more or less, alter the alignment etc.
You should now have something that looks like this. The white is just so you can see it better.

Step 13:
Merge all the rectangles down.
Step 14:
Duplicate the layer. (Ctrl + Shift + D)
Step 15:
New layer between the two rectangle layers.
Step 16:
Open any image you like and paste into the new layer. You will probably have to resize it. The black rectangles will indicate what you will be left with. Experiment!
Step 17:
Magic Wand at 50% (default) the top rectangle layer anywhere outside the black.
Step 18:
Go to your image layer and press Delete on the keyboard.
Step 19:
Move the image layer up one.
Step 20:
Select all of the bottom black rectangles layer with Rectangle Select tool. Select Move Pixels or press ‘m’ on the keyboard.
Step 21:
Using your directional arrows on the keyboard, press once to the left.
Step 22:
Hold down the CTRL key and press the right arrow key 3 more times and the down key 3 times.
Each time you hold down the CTRL key & press the arrow key it moves the selection by 10 pixels at a time. Without the CTRL key it moves them 1 pixel only. If you don’t do it once without the CTRL it copies as it moves. We don’t want this to happen.
Step 23:
On the layer you’ve just moved, run a Gaussian Blur @ 40 or so.
You can stop at this stage, depending on the look you want and just add a background. I’ve used both on different images.
This is what you should have now.

In the example I’ve duplicated the blurred layer to give it more “pop” on the background. The white background again is to show the work.
Continue for a thicker panel…
Step 24:
On the picture panels, run a Drop Shadow at default.
Step 25:
Turn off or delete the unblurred layer.
Step 26:
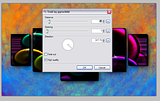
Run Trail as shown below.
Step 27:
You may have to duplicate the blurred layer depending on the darkness of your background, as I did.
Step 28:
Add a new layer to the very bottom of your image & create a background of your choice.
Step 29:
I always save as a .PDN first and then as a .PNG
Step 30:
Resize the image to 50% and save. Done!
Please post your result & any questions as I am happy to help.
Object Align -Part of KrisVDM Pack
Mirror - Part of Evanolds pack
Gaussian Blur
Drop Shadow - also part of KrisVDM Pack
What you are aiming for:

For this one we will make it a wallpaper. I will use 1280 x 768 as the finished size.
Step 1:
Open a new image to 2560 x 1536 so that it is twice the finish size. At 4 times my computer will crash but I usually work at 4 times the finished size if doing 800 x 600.
Step 2:
Make a new layer.
Step 3:
With black as you colour, select filled rectangle. Draw a black rectangle approximately in the centre, approximately 600 pixels wide and 1000 high. It really doesn't need to be exact. You can make more panels or adjust the size, width, height to suit yourself.
See image below for the method:

Step 4:
Use Object Align – Center Both
Step 5:
New layer
Step 6:
Again make a rectangle about 400 x 700 on the left hand side. When moving elements, always use the ellipse or rectangle select. Magic Wand will leave pixels behind – not a good look.
Step 7:
Move the image so that it is about 50 pixels to the left of the centre rectangle.
Step 8:
Object Align – Vertically
Step 9:
Mirror left half over right.
Step 10:
New layer and make a rectangle about 300 x 500. Move the image so that it is about 50 pixels to the left of the previous rectangle.
Step 11:
Object Align – Vertically
Step 12:
Mirror left half over right.
You can make the rectangles any size you like, have more or less, alter the alignment etc.
You should now have something that looks like this. The white is just so you can see it better.

Step 13:
Merge all the rectangles down.
Step 14:
Duplicate the layer. (Ctrl + Shift + D)
Step 15:
New layer between the two rectangle layers.
Step 16:
Open any image you like and paste into the new layer. You will probably have to resize it. The black rectangles will indicate what you will be left with. Experiment!

Step 17:
Magic Wand at 50% (default) the top rectangle layer anywhere outside the black.
Step 18:
Go to your image layer and press Delete on the keyboard.
Step 19:
Move the image layer up one.
Step 20:
Select all of the bottom black rectangles layer with Rectangle Select tool. Select Move Pixels or press ‘m’ on the keyboard.
Step 21:
Using your directional arrows on the keyboard, press once to the left.
Step 22:
Hold down the CTRL key and press the right arrow key 3 more times and the down key 3 times.
Each time you hold down the CTRL key & press the arrow key it moves the selection by 10 pixels at a time. Without the CTRL key it moves them 1 pixel only. If you don’t do it once without the CTRL it copies as it moves. We don’t want this to happen.
Step 23:
On the layer you’ve just moved, run a Gaussian Blur @ 40 or so.
You can stop at this stage, depending on the look you want and just add a background. I’ve used both on different images.
This is what you should have now.

In the example I’ve duplicated the blurred layer to give it more “pop” on the background. The white background again is to show the work.
Continue for a thicker panel…
Step 24:
On the picture panels, run a Drop Shadow at default.
Step 25:
Turn off or delete the unblurred layer.
Step 26:
Run Trail as shown below.

Step 27:
You may have to duplicate the blurred layer depending on the darkness of your background, as I did.
Step 28:
Add a new layer to the very bottom of your image & create a background of your choice.
Step 29:
I always save as a .PDN first and then as a .PNG
Step 30:
Resize the image to 50% and save. Done!
Please post your result & any questions as I am happy to help.







 "]
"]

 This looks very interesting. I don't know when, but i am going to try this one day. Thanks for sharing.


