Post by barbieq25 on Jan 12, 2011 12:48:06 GMT
Making a Jewel - a tute from me at last! If there is anything that needs to be changed please let me know.
Plugins:
Align Object
Drop Shadow
Fast FX or Glow and Soften Portrait
Bevel Selection
Gaussian Blur
Circle text
Radial Blur Deluxe
Zoom Blur Deluxe
Flag image: Flag
FONT:AEROFOIL
This is what you should end up with (or at least close to it):
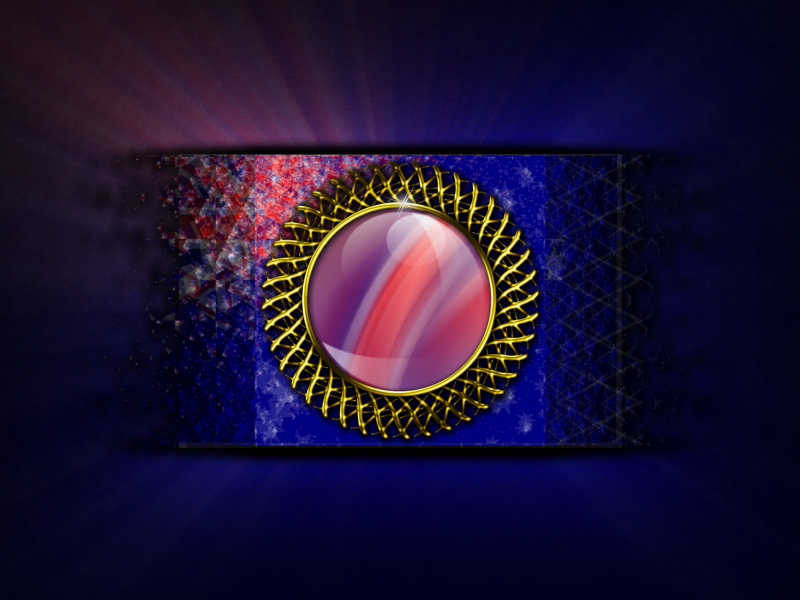
Make sure you have all the plugins & font downloaded before you start. (The font goes into WINDOWS FONT folder.)
1. Start with a 3200 x 2400 canvas.
2. Make the background black.
3. New layer
4. Select yellow for the primary colour. Select Circle Text and Aerofoilput at capital A in the text box 40 times and the remainder settings as shown below:
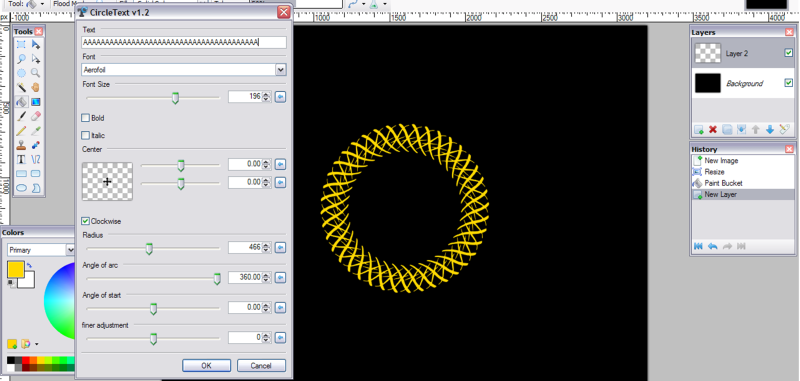
5. Select Magic Wand at default, set the flood mode to global and click outside the circle. Press Ctrl + I to invert the selection.
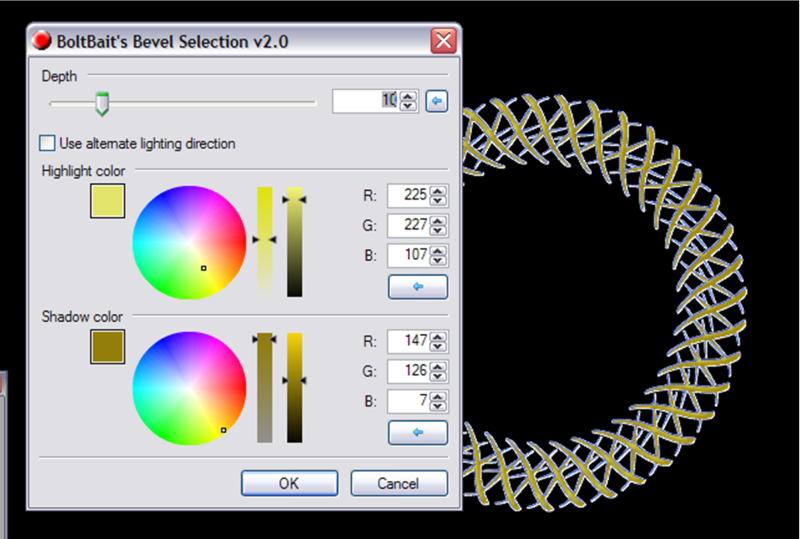
6. Bevel selection at the following settings as shown below: (Depth @ 10, Highlight colour 225, 227, 107 Shadow colour 147, 126, 7)
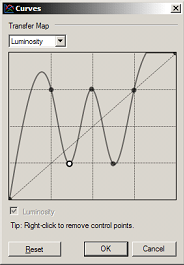
7. Run Curves at the setting shown below:
8. Gaussian Blur @ 2.
9. Duplicate layer and set to Overlay mode. Save your work if you haven’t already done so. If you run out of memory, the program will crash and you’ll lose the lot.
10. On the layer beneath the Overlay mode, use Fast FX Glow – Radius: 6, Brightness -32, Contrast 48.
11. On this same layer run Soften Portrait. Mostly for this one I use the opposite to what we do here but each gold wire is slightly different and you should experiment. For this one we will leave the Softness @ 5, Lighting @ 20, Warmth @ 0.
12. Merge the 2 gold layers down.
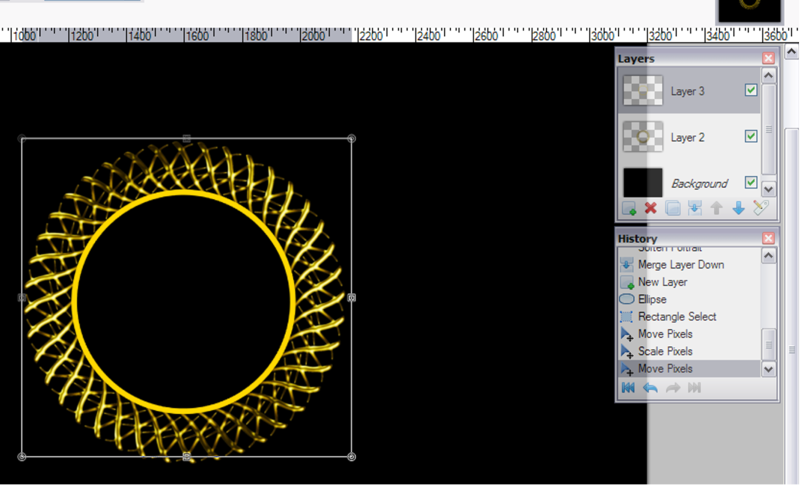
13. New layer. Select brush width to 20. With yellow create a circle (hold down the Shift key) until it looks like it will cover the inner circle of the gold. You may have to use the rectangle select to position it. Avoid using the MWand to select and move as it will leave a single pixel line that will be hard to remove later. See below:
14. Repeat steps 5 to 12. Save.
15. Create a new layer above the black background.
16. Add an image of your choice. I chose the Australian Flag.
17. As an alternative, you can use an existing image. Open the image in Paint.NET, Ctrl + A then CTRL + C then Ctrl + V.
18. If you are using the flag image, Align Object and centre it.
19. Go to Layers and Rotate/Zoom to 2.00. Copy the layer and hide it (untick the layer). Got to layer below the one you just hid.
20. Radial Blur Deluxe @ 0 Steps and maximum amount or whatever you like.
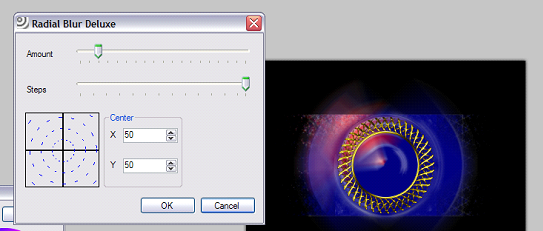
21. Go to the hidden layer and unhide. Radial Blur Deluxe at the settings below:
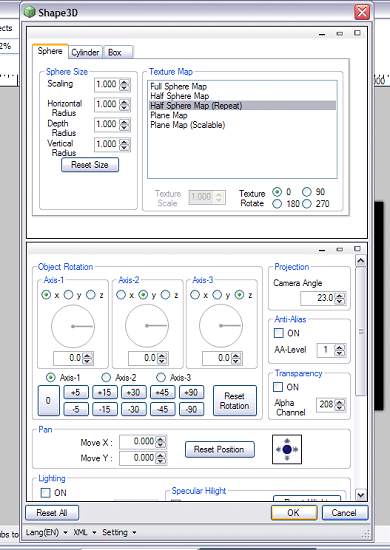
22. Go to Render, Shape 3D, turn off the lighting and set to Half Sphere Map, everything else stays at default, as shown below:
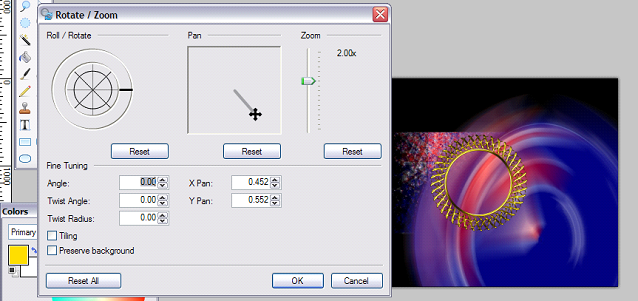
23. Go to Layers and Rotate/Zoom at the settings below:
24. Select Magic Wand and set Flood mode to Contiguous. Select the layer with the plain gold circle, click inside the circle. Ctrl + I and go to the layer we just zoomed up and press delete.
25. Go back to the golden circle layer. Select the inner circle. Create a new layer just below the layer with our coloured circle. Change your primary colour to black and fill the selected circle with black. Select the coloured circle layer and merged these two layers down.
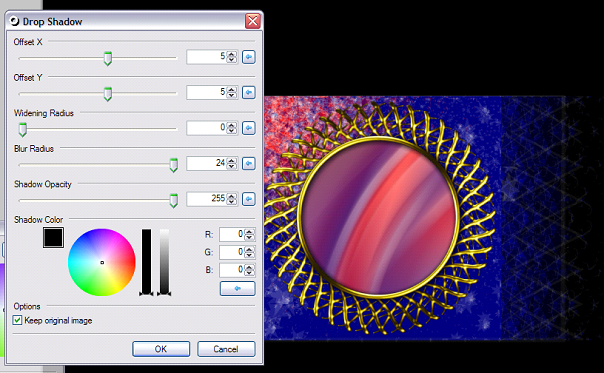
26. Deselect all. Go to golden circle layer and Drop Shadow at the settings below:
27. Select the golden circle text layer and Press Ctrl + F to repeat the Drop Shadow at the same settings.
28. There are a few edges showing through from the Drop Shadow on the wire frame, so go to the golden circle, select the inside of the circle, go to the Wire frame and press delete.
29. I used Helen’s Galaxy Ball Tute for the ball highlight: forums.getpaint.net/index.php?/topic/15707-glossy-galaxy-ball-tutorial/page__p__265529__hl__glossy%20galaxy%20orbs__fromsearch__1&#entry265529
30. I duplicated the blurred flag layer and ran Zoom blur at maximum and high quality on the underneath flag layer. On the topmost flag layer I ran Drop shadow at maximum width and blur, twice. I merged all of the jewel layers except for the highlight, and then Drop Shadowed @ 1 with blur at max.
31. Save your image as a .PDN That way you can re-use parts of the image or make any changes. Then save it as a .PNG, resize your image to 25% and save again before posting.
I am looking forward to see how interpret the tute.
Plugins:
Align Object
Drop Shadow
Fast FX or Glow and Soften Portrait
Bevel Selection
Gaussian Blur
Circle text
Radial Blur Deluxe
Zoom Blur Deluxe
Flag image: Flag
FONT:AEROFOIL
This is what you should end up with (or at least close to it):

Make sure you have all the plugins & font downloaded before you start. (The font goes into WINDOWS FONT folder.)
1. Start with a 3200 x 2400 canvas.
2. Make the background black.
3. New layer
4. Select yellow for the primary colour. Select Circle Text and Aerofoilput at capital A in the text box 40 times and the remainder settings as shown below:

5. Select Magic Wand at default, set the flood mode to global and click outside the circle. Press Ctrl + I to invert the selection.
6. Bevel selection at the following settings as shown below: (Depth @ 10, Highlight colour 225, 227, 107 Shadow colour 147, 126, 7)

7. Run Curves at the setting shown below:

8. Gaussian Blur @ 2.
9. Duplicate layer and set to Overlay mode. Save your work if you haven’t already done so. If you run out of memory, the program will crash and you’ll lose the lot.
10. On the layer beneath the Overlay mode, use Fast FX Glow – Radius: 6, Brightness -32, Contrast 48.
11. On this same layer run Soften Portrait. Mostly for this one I use the opposite to what we do here but each gold wire is slightly different and you should experiment. For this one we will leave the Softness @ 5, Lighting @ 20, Warmth @ 0.
12. Merge the 2 gold layers down.
13. New layer. Select brush width to 20. With yellow create a circle (hold down the Shift key) until it looks like it will cover the inner circle of the gold. You may have to use the rectangle select to position it. Avoid using the MWand to select and move as it will leave a single pixel line that will be hard to remove later. See below:

14. Repeat steps 5 to 12. Save.
15. Create a new layer above the black background.
16. Add an image of your choice. I chose the Australian Flag.
17. As an alternative, you can use an existing image. Open the image in Paint.NET, Ctrl + A then CTRL + C then Ctrl + V.
18. If you are using the flag image, Align Object and centre it.
19. Go to Layers and Rotate/Zoom to 2.00. Copy the layer and hide it (untick the layer). Got to layer below the one you just hid.
20. Radial Blur Deluxe @ 0 Steps and maximum amount or whatever you like.
21. Go to the hidden layer and unhide. Radial Blur Deluxe at the settings below:

22. Go to Render, Shape 3D, turn off the lighting and set to Half Sphere Map, everything else stays at default, as shown below:

23. Go to Layers and Rotate/Zoom at the settings below:

24. Select Magic Wand and set Flood mode to Contiguous. Select the layer with the plain gold circle, click inside the circle. Ctrl + I and go to the layer we just zoomed up and press delete.
25. Go back to the golden circle layer. Select the inner circle. Create a new layer just below the layer with our coloured circle. Change your primary colour to black and fill the selected circle with black. Select the coloured circle layer and merged these two layers down.
26. Deselect all. Go to golden circle layer and Drop Shadow at the settings below:

27. Select the golden circle text layer and Press Ctrl + F to repeat the Drop Shadow at the same settings.
28. There are a few edges showing through from the Drop Shadow on the wire frame, so go to the golden circle, select the inside of the circle, go to the Wire frame and press delete.
29. I used Helen’s Galaxy Ball Tute for the ball highlight: forums.getpaint.net/index.php?/topic/15707-glossy-galaxy-ball-tutorial/page__p__265529__hl__glossy%20galaxy%20orbs__fromsearch__1&#entry265529
30. I duplicated the blurred flag layer and ran Zoom blur at maximum and high quality on the underneath flag layer. On the topmost flag layer I ran Drop shadow at maximum width and blur, twice. I merged all of the jewel layers except for the highlight, and then Drop Shadowed @ 1 with blur at max.
31. Save your image as a .PDN That way you can re-use parts of the image or make any changes. Then save it as a .PNG, resize your image to 25% and save again before posting.
I am looking forward to see how interpret the tute.

