|
|
Post by delpart on Jan 6, 2012 22:09:36 GMT
Okay, here's a place outside of the rants to start discussing a tutorial on transforming this tutorial from PSD to PDN. The premise is to gather ideas and compose a tutorial that could be used by a beginner or intermediate level user of PDN to create a fabulous work of art. So far, one of the major hurdles may be having to use custom mini-brushes to complete the task, or otherwise combining several tutorials into one to complete the project. In this instance, Sargon's excellent how to create smoke tutorial. And then possibly something else I try and re-create that may work for a fast conversion of the face profile ... etc. I guess the first thing is to illicit comments and suggestions and I can come back and amend the first post or whatever suites to keep track of ideas and such. Or we can just plug the ideas in here. (Posted in challenges as a starting point, feel free to move it out later maybe. I figure its a challenge to our community here to engage in such a project, and I'd like to see participation from everyone even if its just support and advice.) |
|
|
|
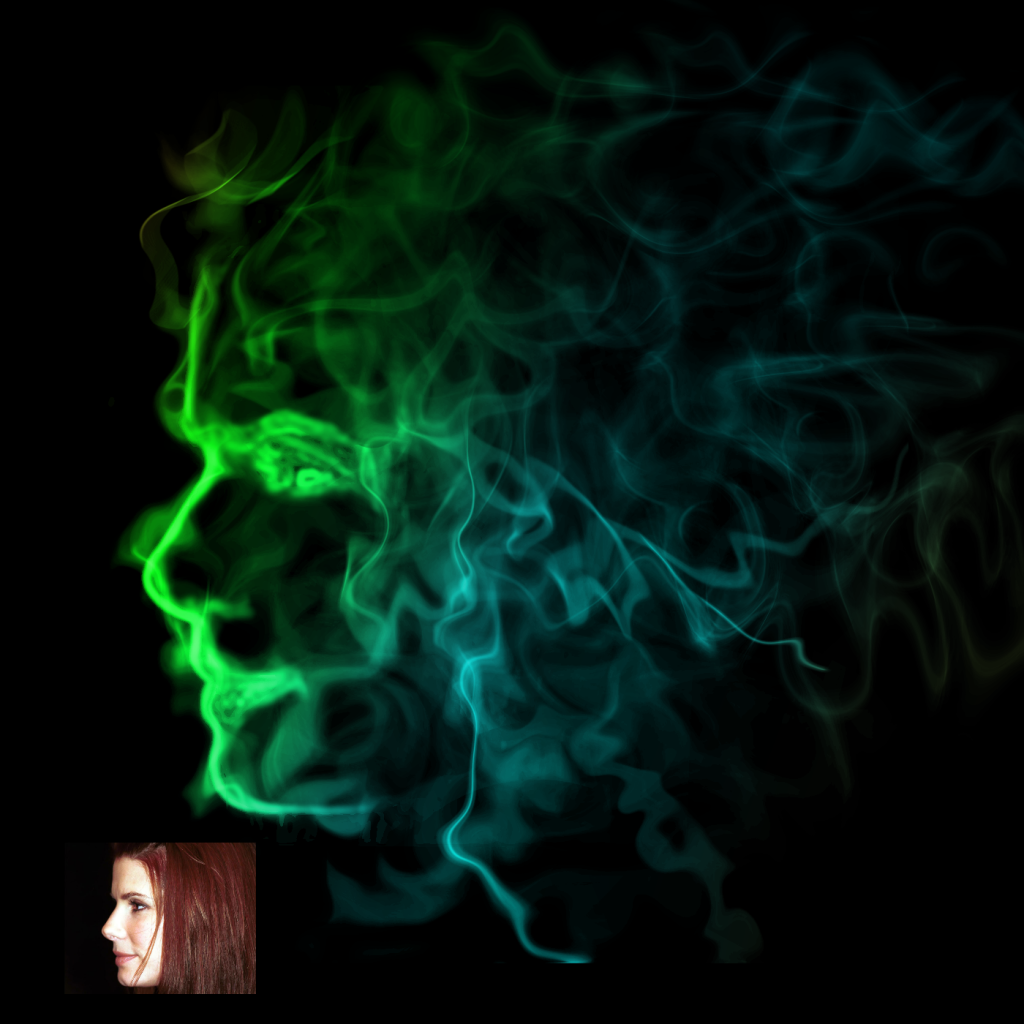
Post by Helen on Jan 7, 2012 4:09:08 GMT
Here's my try (I will post this on DA and will post it on the main board after I fix the bottom of the image): 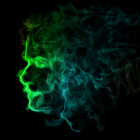 This took me about an hour and 30 minutes (maybe two hours if counting finding the image, experimenting and so on). I used the paintbrush tool from 2-5 thickness, then going to Radial Blur, Splinter, and then Dents. |
|
|
|
Post by Sargon III on Jan 7, 2012 4:28:43 GMT
Wow, Helen, great result, yours is much better than mine. Here I used a combination of the Splinter Lion technique and smoke technique. Took about 30 minutes, but it has a fire effect rather than smoke: Colored: 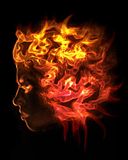 Black/white: 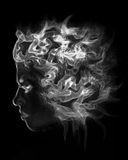 I used same image of the tut, I hope I won't be in trouble. |
|
|
|
Post by delpart on Jan 7, 2012 5:17:45 GMT
Wonderful start. Wish I hadn't been sidetracked this week ... (still banging head into keyboard and such ... and blathering on this and that forum to distract me from a mental block or two ...)
Righto, Helen's is spot on and didn't require use of brushes so I'm already jealous. Though based on the steps I'm scared of it being a hand trace ... That's just me though. Lots of people with that much control.
Sargon's yours is definitely in the ballpark. Less moire pattern from the dents and it could be called a variant easily of the basic technique(s) required to do something like this.
Also, that other image was placed technically in the public domain and wasn't water marked and such. And since this is non-commercial application, its fair game for an example. Though if we push a tut, we'll need a different image.
Speaking of which, can we share out one image to base the effect on? (Though at this point I think Helen's approach is probably a one and done, I'm curious if there are any other cats to be skinned here ...)
Right back to work for me ...
|
|
|
|
Post by Helen on Jan 7, 2012 5:29:15 GMT
@sargon: That's a cool technique. Splinter is actually a good tool for this type of effect. delpart: I tried to follow the tutorial and then outlined the nose and mouth, the rest was just squiggly lines not following the path of the hair at all. Can't wait to see your result! |
|
|
|
Post by Sargon III on Jan 7, 2012 5:51:07 GMT
Thanks delpart and Helen, sorry, I think I wasn't clear enough about the techniques, I didn't use the Splinter part of the technique, I just got the outlines from it, then continued with the smoke effect, it all depend on your taste and how you liquify the fragmented lines to get your desired smoke shape/flow, I am not good at it.
Oh, BTW, you can create your own brushes from the smoke.
|
|
|
|
Post by barbieq25 on Jan 7, 2012 11:34:12 GMT
I for one do not know how to use brushes let alone create my own. Someone want to point me in the right direction - or at least use Goonie's rocket to get me there?? ;D  I do like both Sargon's & Helen's outcomes. I'd probably like to see everyone do their own faces but I think the one from the tute should be ok? |
|
|
|
Post by delpart on Jan 8, 2012 1:44:55 GMT
Well I'm not beyond the install and test stage with the brushes yet myself to be an authority per se, but let me link the tutorials and such needed since we may want to include these as alternate links anyways. (WIP, suggestions welcome, and all that.) The plugin needed: CustomMiniBrushes Plugin page on main forumA tutorial on how to install brushes: Tutorial on how to get, convert and place brushes.(((*** A note here about ABRViewer. I tried both the version mentioned in the above tutorial and the 2_2.0 which is available from the link provided ... If your system can run the 2_2.0 its really easier to work with. It has an export feature that makes for quick and dirty placement of the brushes instead of copying from a cache (temp folder) created by the other version. Also keep in mind that you may actually want to clear out this its cache (temp) directory to make things easier ... I guess I need to write a mini-tut after all dont I ... There is no easy way to explain what I'm sure will be a visual experience without pictures. It can be done, but I doubt anyone here wants to read a bunch of ../[path] like directions. ))) A link to the 2_2.0 version: ABRViewer 2_2.0 download link at Sourceforge((( Note that this version does not get "installed" ... you simple unzip/unpack it to where you want it. Let me know if anyone needs a .zip version instead of the .rar that sourceforge always likes to use. (I need to see what kind of trouble I might get into for repackaging and offering this up. If its just for us, I dont see a problem, but this forum is read by lots of guests ... I really dont want a cease and desist letter this week. Better yet, PM for .zip link if you can do .rar files.) A link to the brushes used for the original tutorial: Smoke brushes used in the original tutorialSince everyone misses the comments on this: If you want a new folder in your Custom Brushes to show up in the tool, it must start with an underscore. Example: C:\Users\delpart\Documents\Paint.NET User Files\Custom Brushes\ _SMOKEEven I forgot after jumping through all the hoops of grabbing some .abr files etc. Another good note here is that you can of course simply create your own .png files of any size you'd like (typically the larger the better, but I already noticed this may not be optimal in all cases). Okay, note to self, start making screen shots to explain how to deal with abrviewer since the layout is a tiny but different and the method of using the "export thumbnails" makes it easiest to copy new brushes ... Though I do understand why they say to simply copy from the cache, I'm not a fan of senseless disk space waste ... Something else I need to include I guess. Grrrr. Write a tutorial on how to write a tutorial to make a combination tutorial anyone? Or am I just getting cold feet already? Starting point. I'll probably come back to add to this. |
|
|
|
Post by barbieq25 on Jan 8, 2012 2:07:12 GMT
Good start I think. I will have a go this evening.
|
|
|
|
Post by delpart on Jan 8, 2012 2:18:43 GMT
Also, a note about Brusheezy: Not all the brush packs are .abr files there. Some are gimp files, some plain old .png collections. I noted this from a few random grabs. Other sources that are geared 100% at PSD tend to have the backward compatible .abr files.
That's another thing as well. I ran into a couple of different versions of .abr files and have not discovered what the difference is. I'd imagine its like most things: new stuff, new file formats, more features (bloat) etc. **EDIT and potentially MAC file format, forgot to look at that ...
Again, these are the sorts of things as warnings in a tutorial that are hard to craft without being discouraging. PDN tweaking is not for everyone. Hopefully 4.0 will make this simpler (praying for the plugin install interface from .zip package) ... I'm sure this would make the mods happy to some degree.
Right, back to creating a starting point on using the new .abr viewer.
Question: I'm lacking some tools, but being a Microsoft slave I tend to use Word a lot for this sort of thing and simply save to PDF (they get big though unless you control your image sizes) ...
I'll test grabbing a tutorial and seeing what word does with from the forum format first before I go off any more on this tangent.
|
|
|
|
Post by barbieq25 on Jan 8, 2012 6:09:30 GMT
PDF seems to work well for most people. Other wise tend to do it all in Word & then copy/paste into a post complete with images. Only problem with that is if people want to print it as I used to.
|
|
|
|
Post by delpart on Jan 8, 2012 7:05:26 GMT
For sure I was thinking to do both. I'm a big fan of download for later instruction sets. Just is a pain to maintain the document if the main changes (like forums migrate to a new server due to links ... ) *shrug* All good. I got a little distracted working on an effect for the smoke ... playing with brushes dangerous to me. I just lost a couple of hours making an underwater like scene. And then something else when I used lomo to frame off the borders by mistake ... Speaking of which, does anyone else find this creepy? Definitely not applicable to smoke effect but I got a wee bit carried away and its creeping me out: 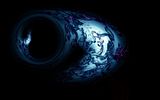 |
|
|
|
Post by blackpenny on Jan 8, 2012 20:10:50 GMT
I think it's more mysterious than creepy. I like it! Great colour, especially the hint of purple.
|
|
|
|
Post by delpart on Jan 8, 2012 20:41:43 GMT
Yeah today, in the light, without walking out into the fog it just reminds me of B&W speakers. Something I've always wanted as a borderline audiophile but could never afford. Class A, plus art ... Art of Noise used them on an album cover. Reference in case you're never heard of what I'm sidetracking about: Article showing wonderful speakers, first is a B&WArt of Noise cover art with speakersOkay, sorry for the "ooh, something shiny side bar item. Back to trying to get edge detect to work on a bright image for me ... grrrr. |
|
|
|
Post by barbieq25 on Jan 8, 2012 21:33:17 GMT
OK, got sidetracked! The Nautilus speakers are so hot they'd put a horn on a jelly fish. These are on my birthday wishlist.
Didn't get a chance to PDN, getting rady for work for the new year etc. Possibly Tuesday night.
|
|
|
|
Post by Helen on Jan 8, 2012 22:53:25 GMT
delpart: That's a very cool image. I agree with BP that it looks more mysterious.
|
|
|
|
Post by Sargon III on Jan 9, 2012 3:14:42 GMT
delpart, your image looks so cool, I think to get a good result of smoke from brushes we need to add them carefully noticing the direction, shape, blending and flow of each brush. And regrading writing a tutorial, I prefer the direct one, the one you create it using forums tools and linking the images, but barbie has a good point when it comes to print it or Save/view it offline, but the reason I like this method is the simplicity of editing it, not like the Word application one, there you need to Edit the file, re-PDF it, upload it again to the hosting site ( BTW not all hosting sites support PDF format) then link it to the forum thread usually as a downloadable link, but there is away to open it directly in the browser with a direct link. And you can also make the tutorial in PDN as a one JPG image with a long dimension ( Height) including the text, but this method is hard for future editing. OK, this video show a more advanced technique of creating a one piece of smoke, @ barbie, you can save only Layer3 shown at 4:50 in this video as a PNG file, save it in Custom Brushes folder, to use it with the plugin. youtu.be/kolJWafsz6g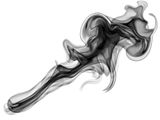  
|
|
|
|
Post by Helen on Jan 9, 2012 3:59:24 GMT
This is way cool, Sargon!  And I have a question. If you want to outline something let's say a flower, you just follow the shape of the flower and then apply the same settings you showed, right? |
|
|
|
Post by Sargon III on Jan 9, 2012 7:23:18 GMT
You mean follow the shape of the flower with PaintBrush on a new layer, then continue the method to give the flower a smoke effect? If yes, then yes, it work like that also, it all depends on what are you trying to achieve, for example, if you use it on text, it gives a good result: I like this Tutorial too.Attachments:
|
|
|
|
Post by Goonfella on Jan 9, 2012 19:36:51 GMT
I for one do not know how to use brushes let alone create my own. Someone want to point me in the right direction - or at least use Goonie's rocket to get me there?? ;D ;D ;D Anytime Barbie.  Sorry I have not been participating in this Community tut, I`ve been so busy with Barbie`s transport (  ). Awesome results from everyone so far though. |
|
|
|
Post by TheBad1 on Jan 9, 2012 19:58:17 GMT
Beautiful results from everyone. Inspiration to have a play around ...
|
|
|
|
Post by Pixey on Jan 9, 2012 22:48:46 GMT
Golly What beautiful stuff has been done here. I'm SO frustrated I can't join in for at least a month. Beautiful work everyone and Sargon's video is something I'm going to jump on when I can |
|


 And I have a question. If you want to outline something let's say a flower, you just follow the shape of the flower and then apply the same settings you showed, right?


 ). Awesome results from everyone so far though.
 "]
"]
 "]
"]